Warmup
Part A: First Steps (Up a Pyramid!)
One of the main activities this week will be building a pyramid with the picture module. This exercise will get you through some of the basic math involved. Here are some examples of the pyramids you’ll be drawing. All three images use a square 400 x 400 pixel canvas. The first pyramid has 3 bricks in the base, the second has 17, and the last one has 123. The input of your program will be the total_rows in the pyramid (i.e. its height in bricks), and the canvas_size, which represents the width of the canvas in pixels. (Since the canvas is square, canvas_size is also its height).
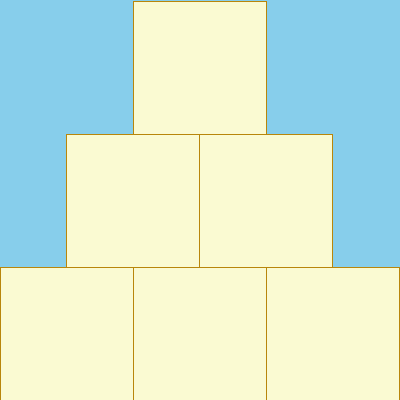
400 x 400, 3 bricks
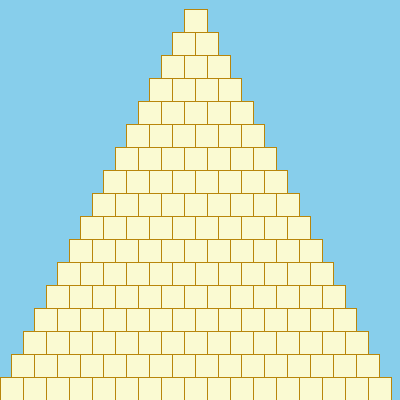
400 x 400, 17 bricks
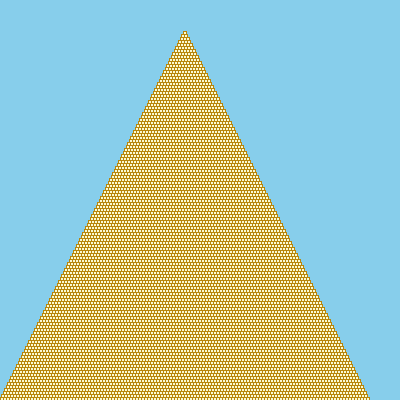
400 x 400, 123 bricks
Notice that the pyramid doesn’t necessarily fill the entire canvas to the right and to the top; if the canvas width is not evenly divisible by the number of bricks, then there will be extra blank space.
Extra
Why is there so much blank space in the third example? Seems like you could fit lots of extra bricks both to the right and up top…
For each of the following questions, work on the question yourself for a few minutes, then discuss with your partner.
Suppose you have a canvas that is 7 units wide and 7 units high. It may be useful to imagine that the canvas is made of graph paper and is 7 squares wide by 7 squares tall. Suppose that you want a pyramid that is 3 bricks tall (that is,
total_rows = 3). You’d like the bricks to be as large as possible, but they should all be squares of the same size, and they must use a whole number of units (i.e., squares on our imaginary graph paper). What is the side-length of each brick? That is, how many units wide / tall is each brick?How many bricks are:
- in the 0th (bottom) row?
- in the 1st (middle) row?
- in the 2nd (top) row?
More generally, suppose your canvas is
canvas_sizewide andcanvas_sizehigh, and that your pyramid istotal_rowstall. Let’s definebrick_sizeas the width (and also height) of each square brick. What isbrick_sizein terms ofcanvas_sizeandtotal_rows? In other words, if you knew thecanvas_sizeand thetotal_rows, how could you use these to findbrick_size? Use Python’s integer division if necessary.If our pyramid is
total_rowstall, then the number of bricks across at the base is alsototal_rows. Thus we have that- Row 0 contains
total_rowsbricks - Row 1 (just above row 0) has
total_rows- 1 bricks - Row 2 (just above row 1) has
total_rows- 2 bricks - Row
total_rows- 1 (the top row) has 1 brick.
How many bricks does row
rcontain, in terms oftotal_rowsandr?- Row 0 contains
If our pyramid is
total_rowstall and each brick has sides of lengthbrick_size, then the first brick of row 0 starts at x-coordinate 0. The first brick of row 1 starts at x-coordinatebrick_size//2, and the first brick of row 2 starts at x-coordinatebrick_size.What is the x-coordinate of the first brick of row
r, in terms ofbrick_sizeandr?If our pyramid is
total_rowstall, our canvas iscanvas_sizepixels high, and each brick has side-lengthbrick_size, then the bricks of row 0 have y-coordinatecanvas_size - brick_size. The bricks of row 1 have y-coordinatecanvas_size - (2*brick_size), and the bricks of row 2 have y-coordinatecanvas_size - (3*brick_size).What is the y-coordinate of row
r, in terms ofcanvas_size,r, andbrick_size?
Reminder
After you write your answers in WARMUP.md be sure to commit and push your changes!
Part B: Cornerstone
To get you started with your pyramid, check out pyramid.py. It’ll give you some starter code for getting your canvas set up, with reminders of what various statements do. There is a ton more information about different commands (which you can and should use in Part 3 of this week’s lab) in the picture module documentation.
picture.py contains code for filling the canvas with the color "skyblue". You’ll draw your pyramid over top of it. Your job for now is just to draw the bottom-left square of the pyramid. You’ll draw the rest as part of the main lab.
Put the following code where the comments say
brick-drawing code goes here:picture.draw_filled_square(0,400,40)The canvas is 400 x 400 pixels, so this should draw a 40 x 40 brick in the bottom left corner, right? Run the code and see what happens. You should see… nothing. Read the documentation for
picture.draw_filled_squareand see if you and your partner can figure out what went wrong.What is the correct code to draw a 40 x 40 rectangle in the bottom left?
Reminder
After you write your answers in WARMUP.md be sure to commit and push your changes!
Part C: Bug Hunt
In a later part of this lab, you’ll be implementing a Monte Carlo method—that is, you’ll be using random number generation to estimate quantities that might be difficult to derive using formulas. This warmup gives you a trial run: we’ll look at a couple of programs which estimate what fraction of integers between 1 and 1,000,000,000 are divisible by 3 but not by 5. Note that you could compute this manually with a very long for loop, but Monte Carlo sampling will be faster. (There’s also an even simpler way of figuring this out, but that’s for you to think about.)
In montedivides1.py, montedivides2.py, and montedivides3.py, you’ll find three programs which all follow the same basic algorithm: (1) repeatedly generate random numbers between 1 and 1,000,000,000; (2) check if each number is divisible by 3 but not 5; and (3) count the number of times this property is satisfied, and divide by the number of random numbers overall. Unfortunately, each of these programs has a bug. This will be your chance to practice something called print debugging.
Let’s first make sure that we understand the principles of our Monte Carlo method. On your own, go through the integers from 1 to 25 (inclusive) and determine how many are divisible by 3 but not 5. Then check your results with your partner. Dividing the count by 25 will give you the fraction of integers between 1 and 25 that are divisible by 3 but not by 5. This fraction is also a ballpark estimate of what you can expect as output from the Monte Carlo programs.
Run the
montedivides1.pyprogram several times. Does the program return the same fraction every time it’s executed? Discuss with your partner why the value is changing.Run
montedivides1.pyone more time. It should give you a fraction that’s a bit lower than you expected based on your previous estimate (from Step 1). If you see why already, nice job! But it might not be so obvious, and it definitely won’t be obvious in more complicated programs. One way of helping you understand what’s going on is to temporarily addprint()statements to track the values of the random integerxand the number of divisible integerscount. You want to make surecountis incremented correctly based on each value ofx.Add the line
print(x, count)to the end, but still inside, of theforloop. Thisprint()statement will yield a lot of output, but you should be able to predict generally what it will look like. Before running the new program, discuss with your partner what you would expect to be printed if the program was correct.Now run the program. What do the numbers appear to be divisible by? Feel free to use the Console to check the divisibility of some of the printed numbers. As previously noted, this program should only increment
countwhen the number is divisible by 3 but not 5. Iscountbeing calculated as intended? Talk with your partner to identify what is going wrong.
Now do the same thing for
montedivides2.py. First identify the variables of interest. Then addprint()statements and analyze the output. Then try to pinpoint the bug and fix it.One more:
montedivides3.py. Oh no! This one doesn’t even run. You should be getting an error message like the following:File "montedivides3.py", line 11 is_good = (x % 5 != 0) and (x % 3 == 0) ^ SyntaxError: invalid syntaxAs you may have heard in class, the Python interpreter’s approach to catching errors is generally as follows: it reads your code under the assumption that it is correct for as long as possible. Only when it has read enough that what you typed earlier could not possibly be correct under any circumstances will it crash, and it will tell you the line where it realized all hope was lost. That means that the real bug is often earlier in the code.
Take a look at the line highlighted by the error message: it’s a little complex, but it’s correct. This means the error is earlier. With your partner, find it and fix it.
Reminder
After you write your answers in WARMUP.md be sure to commit and push your changes!
README
If you would like to upload a photo of any drawings you did as a part of your warmup, you can do so by taking a photo of your page on your phone, emailing it to yourself (or uploading it to Drive) and opening the home page of your repository. Once in the view below, click the Add File button and drop your file in. Then click commit at the bottom of the page and ensure the file is in your repository.