Due at 6PM on Sunday February 27.
The two Computer Science labs are King 201 and King 135. Both have desktop machines for you to use, and you can do all of your work for this course on them. However, experience has shown us that many students prefer to use their own computers for coding. The goal for this lab is for you to use both of these environments. In Part 1 we will get you logged in to the lab machines and use Eclipse to write a short program; we'll give you the code for the program. In Part 2 you will install Java and Eclipse on your own computer and again create and run a test program. You aren't required to do Part 2, but you will be happier if you can code on your own device.
Sit down at one of the lab machines and jiggle the mouse to see if it is running. If not, the power button is at the bottom of the right side of the monitor frame; it will take a minute to boot up. The system will ask for your username; mine is bgeitz. It will then ask for your password. If you have a new account you have been assigned a temporary password of oberlin@123 This password has already expired so as soon as you log in the system will askyou to change your password. The system will ask for your current password -- that is still oberlin@123. It will then ask for your password and ask you to repeat your new password (as a guard against typos).
Once you have logged in, make yourself a directory to put your class work in. You can use the File System tool for this. This should be towards the top on the left side of your screen. Click on the FileSystem icon. Under "Places" you should see your home directory; this has a picture of a house next to your name. Click on that; you'll see an empty window because you don't have any files or folders yet. At the top of the FileSystem screen is a File menu. One of the items in this menu is Create Folder. Select this. You will be prompted for the name of the folder and give it CS151. We will use this as the top-level folder for the labs this semester.
Once you have built the CS151 folder click on it; this gives you an empty window because there are no files or folders inside CS151 yet. Again, go to the File menu inside the FileSystem tool and select Create Folder. This will let you place a new folder inside CS151; call this folder Lab0<name>, where "<name> is a placeholder for your last name. For example, I would called this folder Lab0Geitz. This is your project folder for this week's lab. All of your work for Lab0 goes into this folder; this is what you will hand it for Lab0.
Go to the Applications menu at the top left corner of the screen. One item in this menu is Development; click on it. Development is a folder containing many applications that are useful for program development. One of these applications is Eclipse. Select this application.
When Eclipse starts up it needs to connect to a workspace, which is a chunk of memory Eclipse can use for its own purposes. It will make a suggestion for this workspace and you should accept whatever it sugests. Do not change the Eclipse workspace; that is probably the easiest way to make Eclipse fall apart. Just click the button that says "Launch Eclipse".
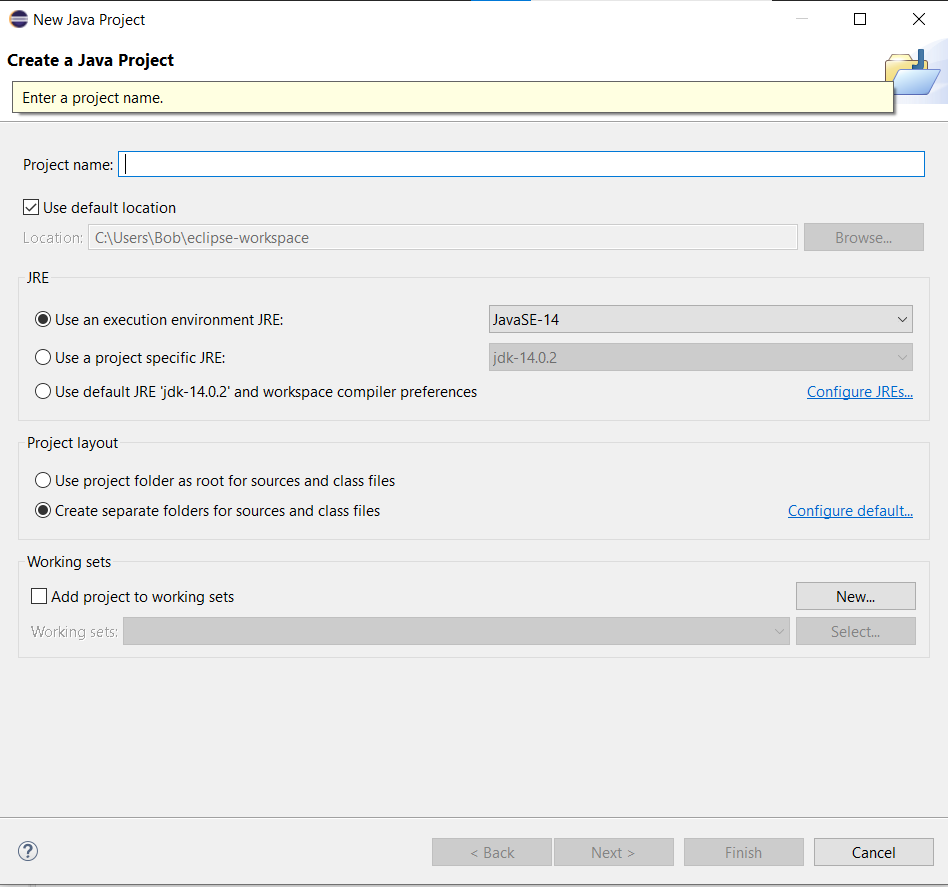
So far you have started up Eclipse. Now we will build a project. This semester you will have one project for each lab. In the Eclipse File menu select New, and then Java Project. You will get a window that looks like this:
Do NOT enter a project name. Instead, unselect the "Use default location" box (which wants to put all of the project files in the workspace where they will be hard to find), and instead use the Browse button to browse to the empty Lab0<name> project folder that you put in your CS151 folder. Click on the Select Folder button to select Lab0<name> as your project folder, and then click Finish. Eclipse may ask if you want to create a module-info.java file. Don't create it. These module-info files can become very large and we won't be using them; they just take up space. You just built an Eclipse project.
A project isn't much good without code, so let's put some code in it. All Java code needs to be inside a class. In particular, Java looks for a class with a method whose signature (i.e. header) is
public static void main(String [] args)
Eclipse will do most of the work for us. Go back to the Eclipse File menu and select New, then Class. You should see a window like this:
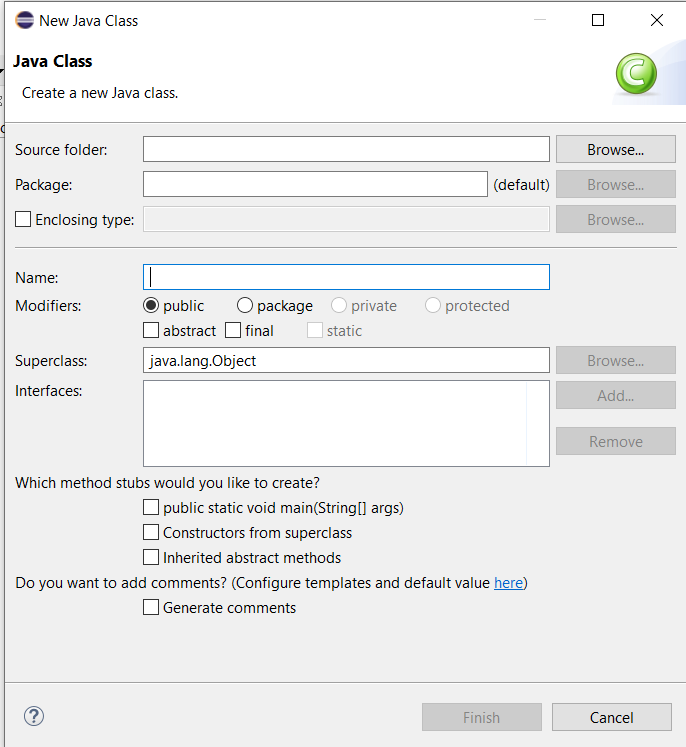
The "Source folder" should be named "src" within your project folder. Click on the Browse button next to the Source folder box and browse until you find the project folder. Click on the little arrow to the left of the project folder name and it will display a folder icon with the name "scr". Click on this and it will put "Lab0<name>/scr" into the Source folder box.
We are going to use Java packages this semester. A package is a group of related classes. In a game there might be one package of classes dealing with the game environment, another package dealing with the characters, still another with user b interactions, and so forth. We will keep things simple. This semester each lab will have one package and one project. We will generally make the project names start with a capital letter and the package names be the same but with a lower-case letter. It is not necessary to include your name in the package name, so enter "lab0" for the package name.
You can ignore the "Enclosing type" but you need to give a name for the class. This is up to you, but FirstClass seems descriiptive enough so type that (or a name of your choosisng) into the Name box.
Finally, the window asks what stubs you would like to create. Check the first box, for public static void main(String [] args) and click Finish. You should see the following window:
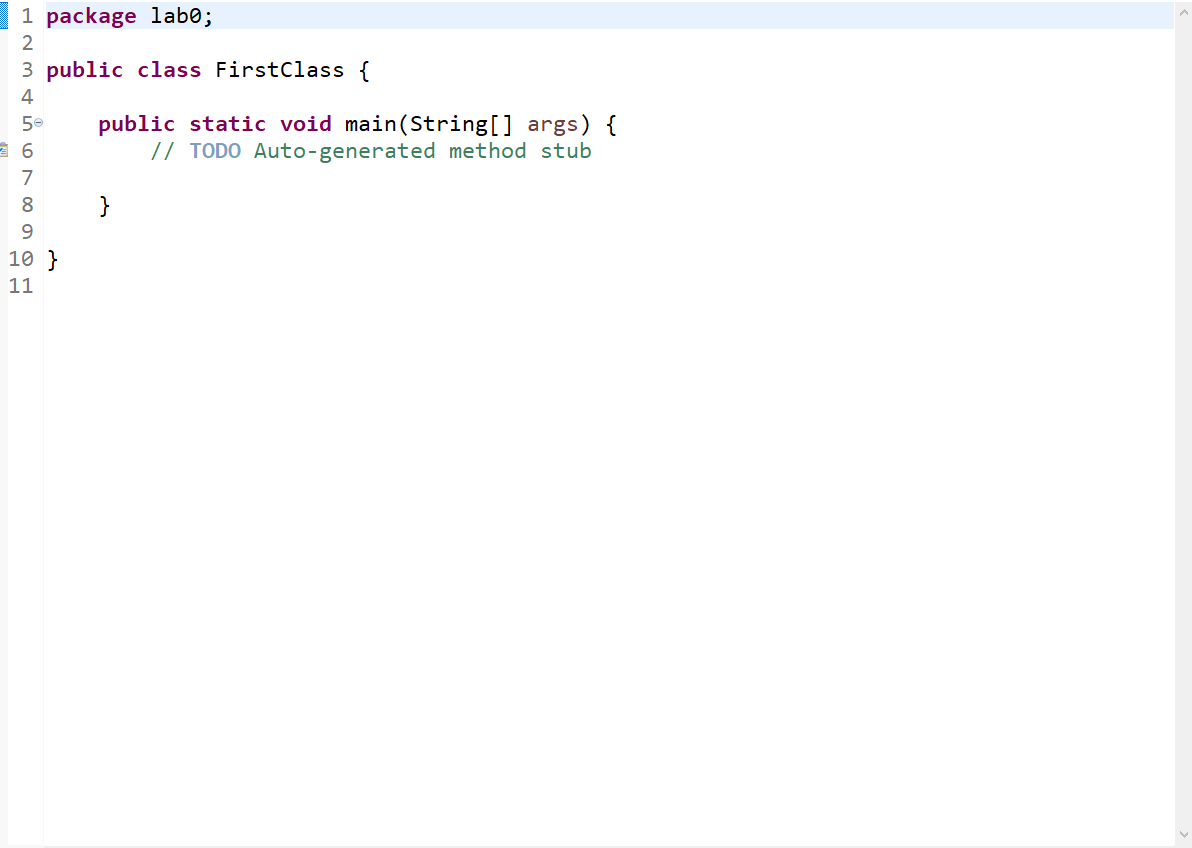
We'll replace that TODO comment with some real code. Edit the main( )) function so it looks like this:
public static void main( String [ ] args ) {

       System.out.println( "Hi, Mom!" );
}
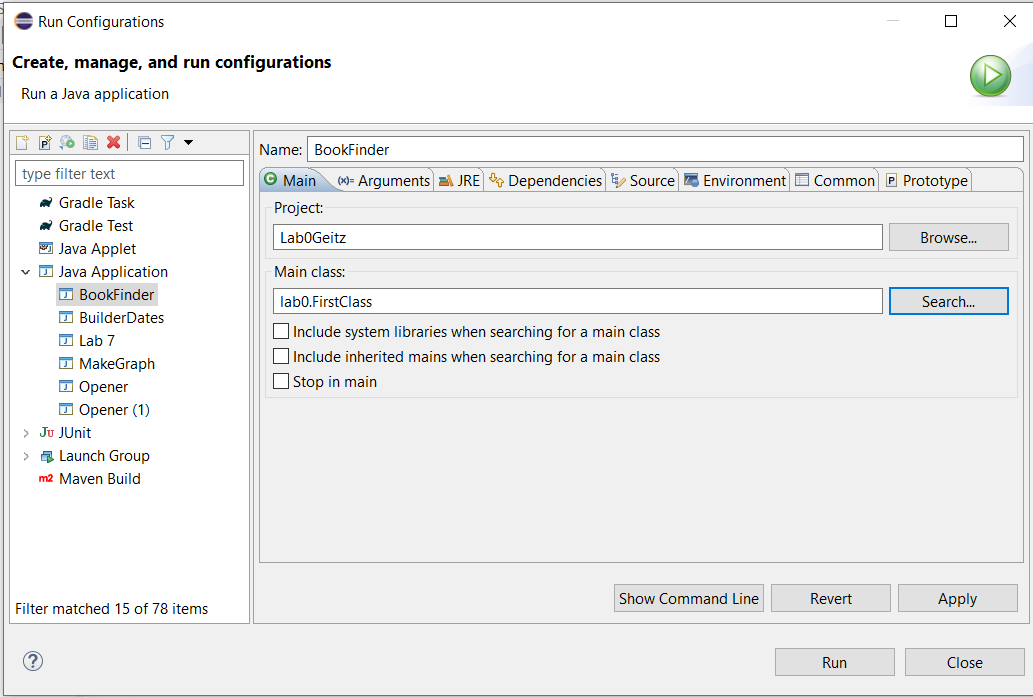
Eclipse is prepared to run any program you have, not just the current project. You have to tell it which program to run. That is one of the jobs of the Run Configurations window. In Eclipse open up the Run menu. One of the many options in that menu is Run Configurations. If you select this you should see a window like this:
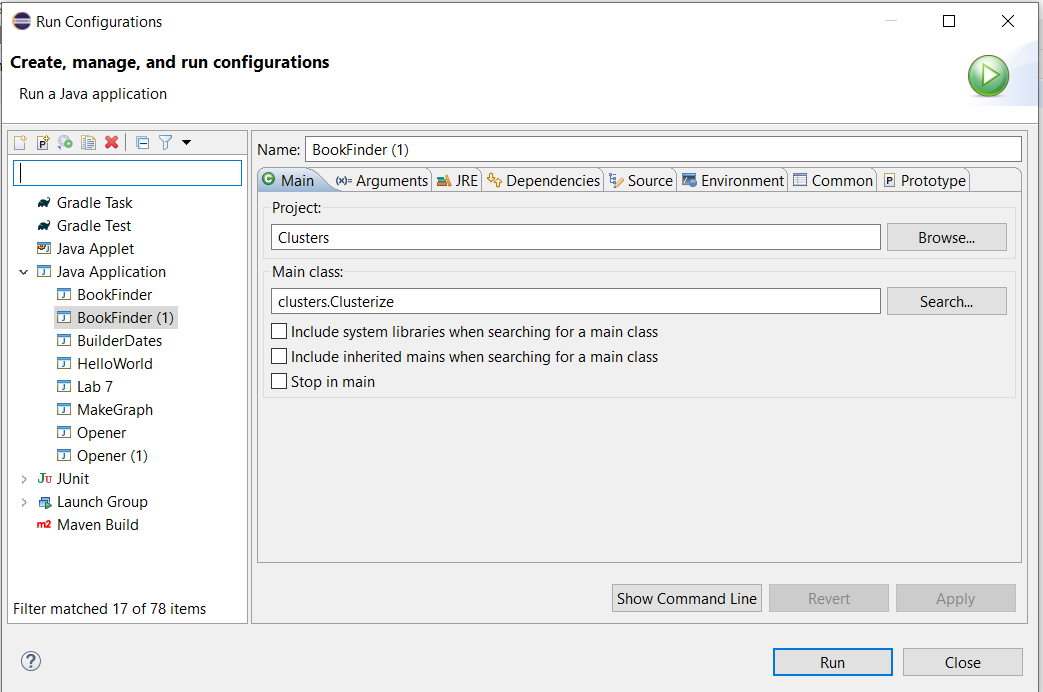
If you see a different Configurations window see below.
The Project and Main class references to "Clusters" that you see in this picture refer to a program I was working on over the summer. Use the Project Browse button to select your Lab0<name> project. Use the Main class Search button to select the class you just built with a main( ) method. I called this class FirstClass. Your Run Configuration should now look like this:
You can now click the Run button to run your program. The ouput appears in a window called Console.
Once you have set up the run configuration it will remain in effect until you create a new run configuration. You can run your program through the Run Configurations window, or through the Run item in the Run menu, or through the Run icon (a green circle with a white triangle in it) in the Eclipse menu bar.
The first time you open the Run Configurations window you might see something like this:
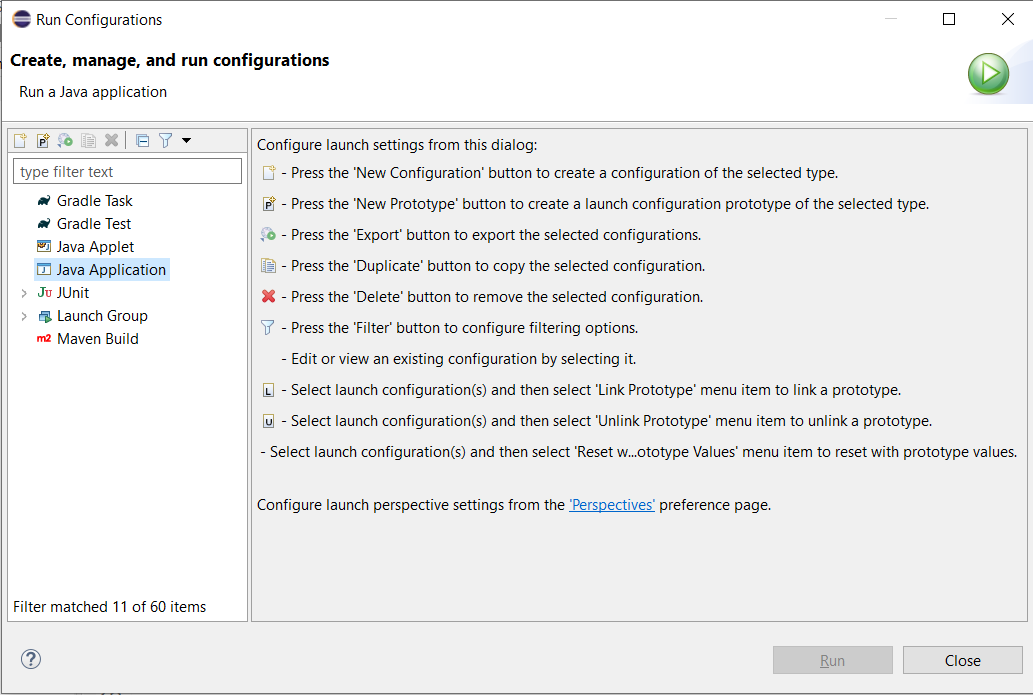
Eclipse is asking you to make a configuration. In the left panel select the Java Application line. At the top of the left panel there are 8 small icons. Selectd the leftmost of these; it will create a new run configuration that you can use to run your program.
Even if you work primarily in the CS labs, you will find it convenient to be able to write or edit code on your own computer. This second part of the lab wil take you through installing Java and Eclipse on your machine. It is possible that ayou already have a version of one or both of these tools. Neither of them needs to be the latest release. The features of Java will use have been in the language from thue start. If you have a working version of Eclipse you can skip this part of the lab. If you have previously installed Java and used it with some other IDE, you only need to install Eclipse. Most of you will not fit either of those cases and will need to install both JDK and Eclipse, so you might as well install the latest version of each.
Note that to install these tools you need to be signed onto your computer as the administrator.
There are two different "Java" libraries. JRE is the
To install JDK, go to your favorite browser and search for "download JDK"; the first hit is probably the one you want: https://www.oracle.com/java/technologies/javase-downloads.html This page tells you you that the current version of Java is Java SE 17 ("SE" stands for "Standard Edition") and it has two download buttons, one for Oracle JDK download, the other for documentation download. You probably don't need the documentation. Click on the JDK download button. This takes you to page where you can indicate which platform you want to install Java on. After a blurb about licenses there is a list of installers. You probably want either the Mac OS installer or the Windows x64 installer. Click on the download link to the right of the appropriate installer. The Java package is about 175 MB. Depending on the speed of your internet connection this will probably take a few minutes to download.
After the download is complete, your downloads folder should have an installer file. On Windows this will have a name like "jdk-17.0.2_windows-x64_bin.exe", though the ".exe" probably won't be displayed. On Macs the file name will be something similar. Double-click on the installer file and let it do its thing -- agree to whatever its asks and let it make the installation in the standard locations. Macintosh users should now be finished with the JDK installation. Windows users have one more step to go.
Here is one situation that is easier on a Mac. In order for the JDK programs to be usable, a system variable called "PATH" needs to be set. This variable tells your system where to find the JDK tools. The Mac OS allows an external program to modify the PATH variable; the Windows OS does not. Windows users need to set his variable themselves. Here are the steps you need to do this:
This should be straightforward for everyone. In your favorite browser go to eclipse.org/downloads. Surrounded by some advertising there is a button labeled Get Eclipse IDE 2021-12. Click on this. It takes you to a mirror site with its own download button. Click on this button. This time your download will actually start, and you will be taken to a page that asks you to donate to the Eclipse Foundation. This is a worthy cause, but it is optional and you might want to wait till you see what you think of Eclipse before donating to it. Eclipse isn't as large as Java; it is only about 50 MB, so this download should go fairly quickly. When it is finished double-click on the installer and let it do its thing. You might get one or more error message about missing parts of Java; just ignore them and click OK. The installer will continue running. It will give you options for installing various versions of Eclipse. You want Eclipse IDE for Java Developers, which is probably the first option. Double-click on this, and on the next page click on the Install button. Accept the license and let it install. The installation takes a while, and it seems that every time I install Eclipse I get a message about it taing longer than usual, but it will complete. At the end of the installation it will offer to launch Eclipse. Launch it.
Now we are going to create and run a Java program to show that your JDK and Eclipse environments are working.
So far you have started up Eclipse. Now we will build a project. This semester you will have one project for each lab. In the Eclipse File menu select New, and then Java Project. You will get a window that looks like this:
Do NOT enter a project name. Instead, unselect the "Use default location" box (which wants to put all of the project files in the workspace where they will be hard to find), and instead use the Browse button to browse to the empty Lab0<name> project folder that you put in your CS151 folder. Click on the Select Folder button to select Lab0<name> as your project folder, and then click Finish. Eclipse may ask if you want to create a module-info.java file. Don't, the module-info files can become very large and we won't be using them. You just built an Eclipse project.
A project isn't much good without code, so let's put some code in it. All Java code needs to be inside a class. In particular, Java looks for a class with a method whose signature (i.e. header) is
public static void main(String [] args)
Eclipse will do most of the work for us. Go back to the Eclipse File menu and select New, then Class. You should see a window like this:
The "Source folder" should be named "src" within your project folder. Click on the Browse button next to the Source folder box and browse until you find the project folder. Click on the little arrow to the left of the project folder name and it will display a folder icon with the name "scr". Click on this and it will put "Lab0<name>/scr" into the Source folder box.
We are going to use Java packages this semester. Each lab will have one package and one project. We will generally make the project names start with a capital letter and the package names be the same but with a lower-case letter. It is not necessary to include your name in the package name, so enter "lab0" for the package name.
You can ignore the "Enclosing type" but you need to give a name for the class. This is up to you, but FirstClass seems descriptive enough so type that (or a name of your choosing) into the Name box.
Finally, the window asks what stubs you would like to create. Check the first box, for public static void main(String [] args) and click Finish. You should see the following window:
We'll replace that TODO comment with some real code. Edit the main( )) function so it looks like this:
public static void main( String [ ] args ) {

       System.out.println( "Hi, Mom!" );
}
Eclipse is prepared to run any program you have, not just the current project. You have to tell it which program to run. That is one of the jobs of the Run Configurations window. In Eclipse open up the Run menu. One of the many options in that menu is Run Configurations. If you select this you should see a window like this:
If you see a different Configurations window see below.
The Project and Main class references to "Clusters" that you see in this picture refer to a program I was working on over the summer. Use the Project Browse button to select your Lab0<name> project. Use the Main class Search button to select the class you just built with a main( ) method. I called this class FirstClass. Your Run Configuration should now look like this:
You can now click the Run button to run your program. The ouput appears in a window called Console.
Once you have set up the run configuration it will remain in effect until you create a new run configuration. You can run your program through the Run Configurations window, or through the Run item in the Run menu, or through the Run icon (a green circle with a white triangle in it) in the Eclipse menu bar.
The first time you open the Run Configurations window you might see something like this:
Eclipse is asking you to make a configuration. In the left panel select the Java Application line. At the top of the left panel there are 8 small icons. Select the leftmost of these; it will create a new run configuration that you can use to run your program.
Here is a chance to get a little more experience with Java. You are going to write a program called Pyramid. This program has a variable SIZE. If we set SIZE=5 and run the program the output looks like this:
    *
   ***
  *****
 *******
*********
Note that if we number the lines of the pyramid from 1 to SIZE then line number i starts with SIZE-i blank spaces and then has 2*(i-1)+1 '*' characters. To make i go from 1 to SIZE use a for-loop. This sounds like an algorithm.
Look back at Part II's directions for making a class and create a new Java class called Pyramid within package lab0. Have Eclipse make a stub for a main method. At the top of the file there should be a directive package lab0; there should also be an empty main method with signature public static void main(String [ ] args). Now we are ready to start coding.
Start by adding to your main( ) method the line int SIZE = 5; Follow this with your code to draw a pyramid containing SIZE rows. You now have a program.
Set up a Run Configuration for the Pyramid program, and then run it. You should see a pyramid of height 5 drawn in the Console window. You may need to expand the Console window to see all of it. Change the SIZE variable to 3 or 10 and rerun your program. Your program should consistently draw correct triangles of whatever size the variable is set to. For the version you hand in, set SIZE = 5.
The Blackboard site for our course has a dropbox for each of the labs. This allows you to hand in a file but not a folder, so we'll make a zipped copy of the project folder and all of its contents.
You can hand in your work either from your laptop or from the lab machines. If you have completed parts II and III on your laptopm open your CS151 folder. Select your project folder (remember, it is called Lab0<name>). Do a right-click or a 2-fingered click on the project folder; this should bring up a popup menu. On a Mac there will be an option compress. On Windows there is an option send to, then a further menu with option compressed file. Either way this should make a zip file you can drag to the Blackboard Lab 0 drop box.
If you prefer, you can hand in work from the lab machines. To do this open the lab computer's File Manager application and browse to your CS151 folder. Select your project folder (remember, it is called Lab0<name>). In the File menu choose the option Create Archive. In the box to the right of the file name there is a long list of different archive formats. Choose .zip. This will create the compressed file Lab0<name>.zip that you can hand in.
Open the Applications menu on your lab computer and select the web browser. With this browser go to blackboard.oberlin.edu. Open the CSCI 151 course, open the Course Material tab and the Lab0 assignment. Choose the Browse Local Files option and browse to your CS151 folder. You should see your zipped project folder Lab0<name>.zip. Click the Open button, then the assignment's Submit button and you are done.