An important aspect of object-based programming is the ability to reuse existing code. A convenient way to achieve this is by the process of specializing the functionality of already existing classes with specific methods required for a particular application. One thinks of "deriving" new classes from old. These newly derived classes are termed subclasses of the existing class, which now becomes the superclass.
In this section, we consider this process with three tiers of classes. The first class is a base-class which is the superclass of all other classes. This class we call <object> and it is a predefined class which has no methods. It is the empty class on which we can build a class hierarchy. Just like the null list is the base object for list construction, <object> is the base class for building a class hierarchy.
It makes sense for all our classes to be derived from this empty base-class because the hierarchical relationship among our classes will be such that any time an object is passed a message which is not directly programmed in its immediate class, it will simply delegate the message to an object of its superclass. Because delegation must stop at some point, we use this base-class as the top class in the hierarchy.
Recall that the syntax for defining classes allows us to directly specify the superclass:
(define <my-class>
  (class (... class parameters ...)
    ([var1 value1]
     [var2 value2]
         ...
     [varN valueN])
    (<object>) ; -- this is the superclass specification
    ([meth1
       (method (a1 a2 ... aN)
         ... method body ...)]
     [meth2
       (method (a1 a2 ... aN)
         ... method body ...)]
     ... more methods ...
     [methN
       (method (a1 a2 ... aN)
         ... method body ...)])))
When we specify the superclass, we are actually creating an instance of the superclass which belongs to our new object. What we have been doing all along is deriving classes from the base-class <object>.
Let's derive a new class from <point-class>. This will be a specialized kind of point, one which has a color in addition to its (x, y) coordinates. It will still have all the functionality of a point: You will be able to MoveTo, MoveRel or Location?, but additionally, you will be able to call the methods Color? and Paint. Notice that we do not need to rewrite the code for any of the inherited functionality; we only provide code for the new functions. Calls to methods which the current class does not explicitly provide are passed on to a parent object, thus providing a type of automatic code reuse mechanism. We use the original definition of <point-class> found in object.ss. This program is found in object1.ss.
(define <point-class>
  (class (x y)
    ([visible #f])
    (<object>)
    ([Location?
      (method ()
        (list x y))]
     [Visible?
      (method ()
         visible)]
     [MoveTo
      (method (newx newy)
        (set! x newx)
	(set! y newy)
	(list x y))]
     [MoveRel
      (method (newx newy)
        (set! x (+ x newx))
	(set! y (+ y newy))
	(list x y))]
     [SetVisible
      (method (value)
	(set! visible (if value #t #f))
	visible)])))

(define <colored-point>
  (class (x y color)
    ()
    (<point-class> x y)
    ([Color?
       (method ()
         color)]
     [Paint
       (method (hue)
         (set! color hue)
	 color)])))
Note that in the superclass specification, we must provide the necessary arguments for the creation of an instance of <point-class>. This is because an instance of <colored-point> must also create its own instance of <point-class> in order to provide all the services of <point-class>. Notice that the variables x and y are passed to <point-class> where they are actually used by methods such as MoveTo.
Take a moment to try out these classes. Here's a brief transcript showing you how to get started:
> (define foo (<colored-point> 6 2 'blue))
> (call Color? foo)
blue
> (call Paint foo 'puce)
puce
> (call Color? foo)
puce
> (call Location? foo)
(6 2)
> (call MoveRel foo 6 -2)
> (call Location? foo)
(12 0)
> (call ThisWillCauseAnError foo)

call: Bad Method: ThisWillCauseAnError.
>
Notice the process of inheritance which occurs automatically. Although <colored-point> does not explicitly define the methods Visible?, MoveTo, and Location? we can still call these methods because they have been inherited from the superclass <point-class>. Notice that because the ThisWillCauseAnError is not a defined method in any of our classes, an error occurs.
One often visualizes the inheritance relationships between hierarchical classes using a diagram in which arrows point from derived classes to their superclass. In this example the inheritance diagram is very simple:
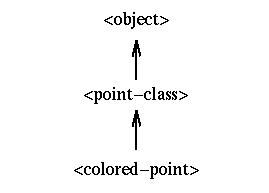
It is important to keep the relationships between classes clear when writing in an object-oriented style. We called derived classes subclasses, but it is important to realize the subclasses are not like subsets. A subclass has at its disposal all of the methods of its superclass and in turn all of the methods up the hierarchy, and thus a subclass can actually possess a superset of the functionality of its parent class. The arrow terminology is a good reminder that methods not defined directly in a class will be called in the superclass. Think of messages being passed up the hierarchy along the arrows. If a class can't respond to a method call, then it delegates it to the superclass.
Now let's explore a more complicated class hierarchy, also involving computer graphics. This time we will use actually draw some graphics by sending graphics commands to MrEd, Dr. Scheme's GUI package. We have hidden most of the underlying machinery which allows communication with MrEd in order to specifically focus on class relationships. All that one needs to know are a set of primitive drawing commands which we simply call in order to draw the graphics.
We begin by creating a class we call <polygon>. This class represents solid-color shapes defined by a closed path of straight lines. We specify a polygon by providing the coordinates of the vertices as arguments. For example, to create a triangle we specify 3 vertices (a total of 6 arguments, since we must provide both x and y coordinates for each vertex). In general, (<polygon> x1 y1 x2 y2 x3 y3 ... xN yN) returns a polygon object of N sides.
Start up a new Dr. Scheme window in the folder containing the downloads from this lab, (require "smm.ss" "graphics-mm.ss" "polygon.ss") in the definitions section, and execute. Now try the following:
> (init-graphics)   ;;this starts up a graphics window
> (define my-tri (<polygon> 2.0 1.0 1.0 2.5 3.0 2.5))
> (call draw my-tri)   ;;draw a triangle
> (define my-rect (<polygon> 5.0 5.0 5.0 6.0 7.0 6.0 7.0 5.0))
> (call draw my-rect)   ;;draw a rectangle
> (define my-shape (<polygon> 5.0 8.0 5.5 9.1 8.0 8.7 6.3 7.0))
> (call draw my-shape)   ;;draw a four-sided shape
(Remove the window by clicking its close button).
Note that the canvas we are drawing on uses the standard graphics coordinate system: the point (0,0) is in the upper-left hand corner. The scale, however, is different (1 unit = 20 pixels).
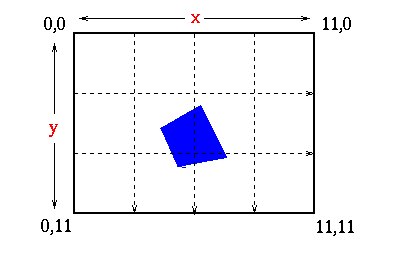
Here are some of the methods provided by the <polygon> class:
Try out a few of these methods to familiarize yourself with the graphics system:
> (define tri (<polygon> 2.0 1.0 1.0 2.5 3.0 2.5))
> (call color tri "red")
> (call width tri .2)
> (call draw tri)
In this exercise we will use the existing <polygon> class to derive several new classes.
> (define new-rect (<rectangle> 1.0 4.5 3.0 5.5))
This will create a rectangle with vertices (1.0, 4.5), (1.0, 5.5), (3.0, 5.5) and (3.0, 4.5). Looking at the definition of <polygon> may be helpful, but isn't really necessary since you already know how <polygon> works. This is an excellent example of existing functionality (provided by another programmer) which we can then expand on without having to know the internal workings of the class.
Simply specify <polygon> with the appropriate coordinates as the superclass of <rectangle> in order to create this new class.
For example:
> (init-graphics)
> (define sq (<square> 4.5 5.0 1.0))
> (call color sq "purple")
> (call draw sq)
Save your solution in ex4.ss.
The class hierarchy you have extended now looks like this:
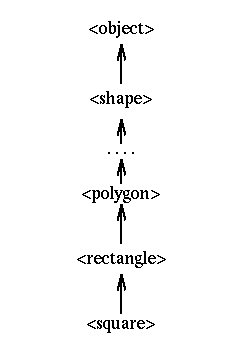
Above the <polygon> class are additional classes which perform general drawing and attribute setting. This is indicated by the ellipsis in the diagram. Let us inspect and discuss this class hierarchy in more detail. Here is the <polygon> class:
  (define <polygon>
    (class points
      ()
      (<filled-shape>)
      ([draw (method () (call fill super 'polygon points))])))
We have specified <filled-shape> as the superclass. The points parameter will be a list of the arguments (we specify this in the same fashion as with unrestricted lambda). The only method defined is the draw method which calls the the method fill which actually draws on the canvas. We call a method contained in a superclass by specifying super as the object much as we did when calling the self-referential object this. Thus we have the following syntax for calling other methods:
Continuing our exploration of the class hierarchy, look at the definition of
You may think that <filled-shape> is somewhat unnecessary, since it specifies only a width method, and it delegates everything else to its superclass. We've left it here because it's a useful step in one of the later exercises.
Finally we have the most general class .
Don't worry too much about the specifics of the methods configure and animate-hsv, but rather look at the relationship between the class hierarchy and the methods. Note that the top class <shape> contains the most general operations such as configure, draw and fill and the derived class adds specifics. We can easily derive more classes such as <ellipse> and <circle>, giving us the following hierarchy.
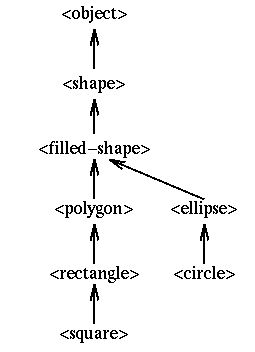
Like the classes <polygon> and <rectangle>, the classes for ellipses and circles are very simple.
The draw method should call the fill-shape method with five arguments:
Example
> (init-graphics)
> (define e (<ellipse>  2 2 7 9))
> (call color e "red")
> (call width e .3)
> (call draw e)
Example
(init-graphics)
> (define c (<circle> 7 7 4))
> (call color c "red")
> (call draw c)
> (reset-graphics)
> (call color c "yellow")
> (call draw c)
By now the technique as well as the ease and elegance of object oriented programming should be clear. In the next section we will explore more details of class hierarchies.